What are the 5 MIG Welding Positions – A Definitive Guide
Back nearly 20 years ago when I was first getting started with MIG welding I knew that you basically pointed the welding gun at the spot that you wanted to weld and pulled the trigger. Everything beyond that was unknown. However, over time learned a lot of things from the types of welds to the actual welding positions that you need to make.
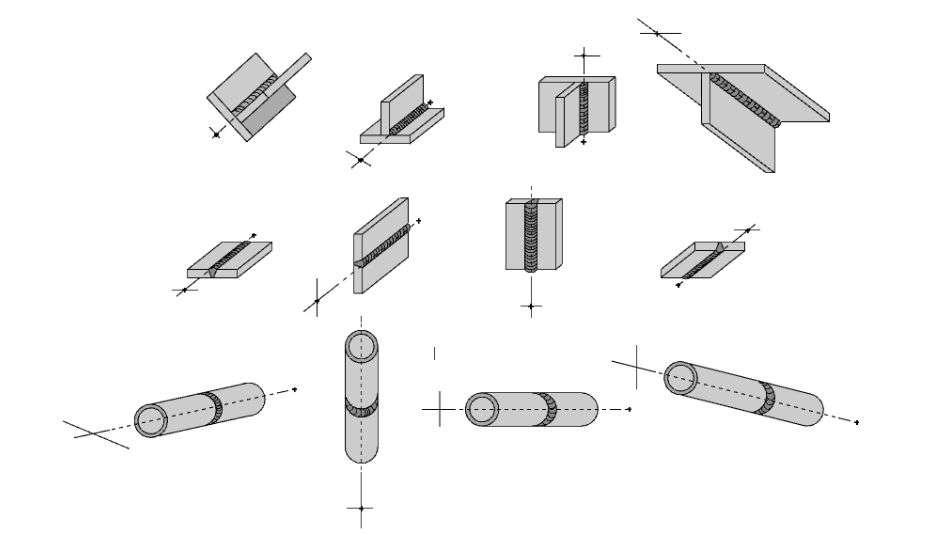
With MIG welding, there are 5 basic welding positions. These positions employ a variety of techniques and comprise the 8 different weld symbols you will often see on charts and how-to guides. These symbols often involve a number 1-4 and a letter, F or G, that denotes the position you will use.
What are the 5 welding positions? The 5 major welding positions are flat weld, vertical weld, horizontal weld, overhead weld, and pipe welds. We cover when you use each position, how it works, and even comprehensively discuss the pipe welding positions, which are technically 1 of the 5 but have their own set of rules entirely from the other MIG welding positions.
By the end of this article, you will be ready to grab those charts and interpret the positions! Just remember that although theory is easy to understand, the application can be very difficult and dangerous.
Start with the easier positions and slowly work your way towards the more complicated ones as you begin mastering proper technique and learning to control your weld pool and heat.
Welding Positions
The 5 basic MIG welding positions all offer different challenges and strengths. There are different instances where you will need to make use of each of these positions.
Let’s break them down into more detail now, so you know when and how to use each different position and technique.
When someone mentions the axis of any welding project, they are referring to an imaginary line that goes through the length of the weld in a perpendicular direction to the cross at the center of gravity.
If you hear that something requires you to weld out of position, it could refer to any position except for the flat weld position, usually horizontal, overhead, and vertical.
They are considered out of position because these positions require more skill and technique. They’re not as easy as a flat position.
#1 Flat Weld
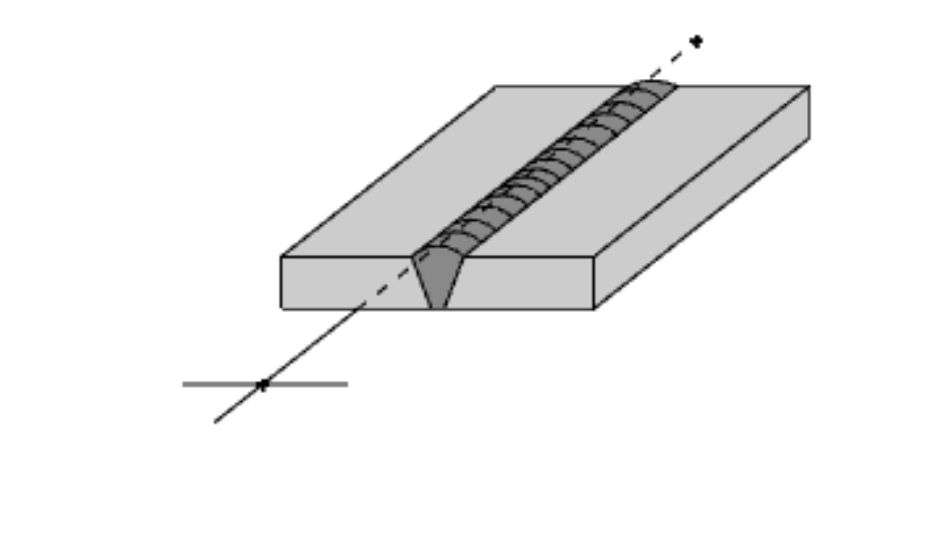
The flat welding position is a dream come true. It’s the easiest position to learn and work with because the weld pool is able to lay flat and be manipulated in any direction you want to move.
For this position, you will be welding from the top side of the joint, with the face of the joint in a horizontal position.
This technique allows you to move your molten metal pool downward so that it can fill the joint. This weld is quick, simple, and very strong.
Side Note: If someone refers to the downward position in welding, they are talking about this flat weld position.
How to Perform a Flat Weld
In order to get beautiful weld beads when working from a flat position, you will need to make sure you maintain the flare motion, tip angle, and position of your flame.
Your torch will need to be perfectly set for the flame you will need on your specific base metal. Creating narrow beading requires you to raise then lower your flame in a circular motion, which will distribute heat evenly.
A 45-degree angle is the best way to position your top as it approaches the base metal’s surface.
If you need a deeper weld for added strength, you need to decrease the speed you’re welding at or increase the severity of the angle between your tip and base metal.
Your weld puddle needs to stay as small as you can keep it, otherwise, you could end up burning through your base instead!
When you use a welding rod to form your beads, you need a small puddle on the surface. Your rod will then be placed into the puddle, which will melt the base metal to the rod.
For proper fusion between the two pieces of metal being joined, you need to move your torch very slowly from side to side. You can control the size of your weld bead by changing up your welding speed and how much metal you’re dropping in from the rod.
#2 Vertical Weld
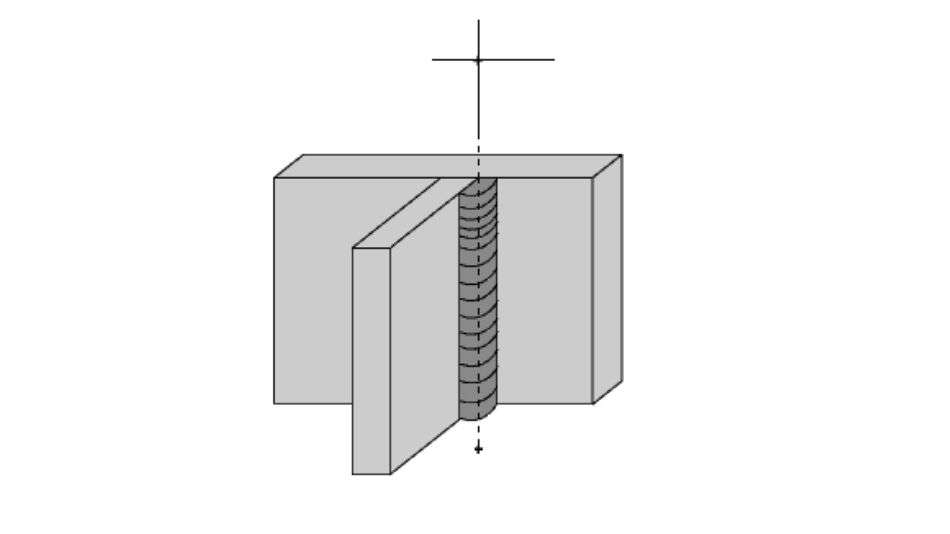
With vertical welding, your weld’s axis will typically be positioned vertically or nearly vertically. The actual welding you will need to do is horizontal instead. You will use positions 3G and 3F for this weld position, which are a vertical groove and vertical fillet weld respectively.
When you use these positions, gravity will try to force your molten metal downwards, which causes it to pile up in one spot of your point instead of getting evenly distributed along the entire weld.
You can prevent this by using a downhill or upward vertical position when you weld.
How to Perform Vertical Welds
In order to keep the molten weld pool from piling in this position, you need to make sure that your flame is pointed upwards and tilted at 45 degrees to your base metal.
This will let you use the bottom of the workpiece. You will be welding against the force of gravity to counteract the tendency to puddle.
How to Perform a 3F Weld on a Lap Joint
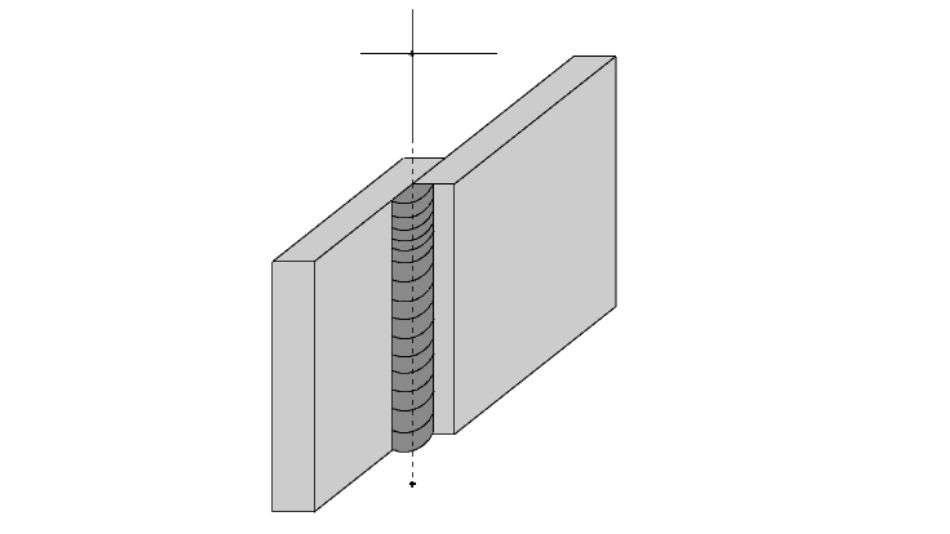
This welding requires a lot of technique. You will need to control your molten weld pool’s overflow with your torch by pointing your flame at a 45-degree angle to the base metal and positioning the rid between the pool and flame.
This position will prevent your molten metal from falling to the ground. It will also make sure that you are seeing enough penetration to your joint, so the metals fuse into a strong weld.
Your torch and welding rod both need to be moved up and down to ensure an even and uniform bead deposition.
You should hold your rod a little bit above the center line and let the flame move the molten pool across your joint for even better and more even distribution.
#3 Horizontal Weld
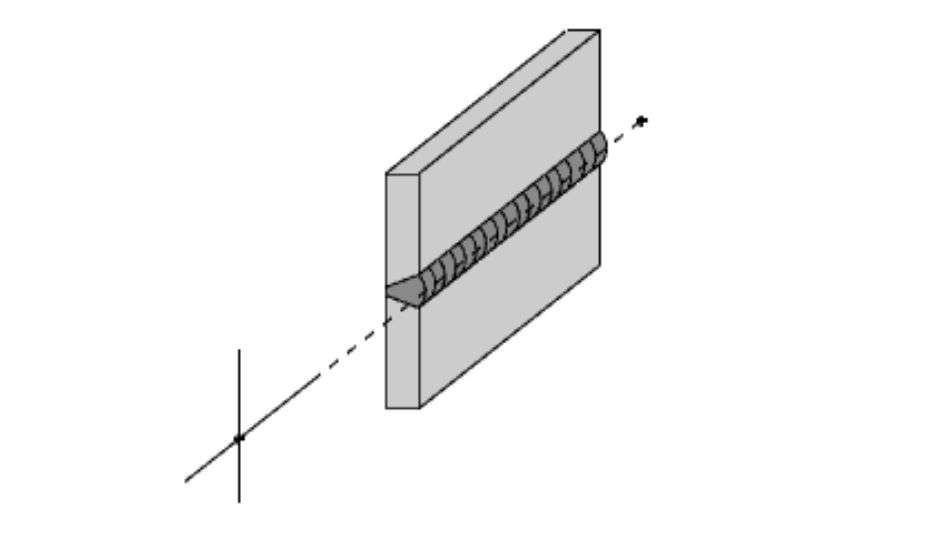
Horizontal welding is a more difficult position to master. In this position, you will have an axis that is almost horizontal. The weld type itself will determine positions.
For more specifics on this position, you need to move to the welding symbol section of this article and read the sections for 2F and 2G positions.
How to Perform a Horizontal Weld in 2F on a Tee Joint
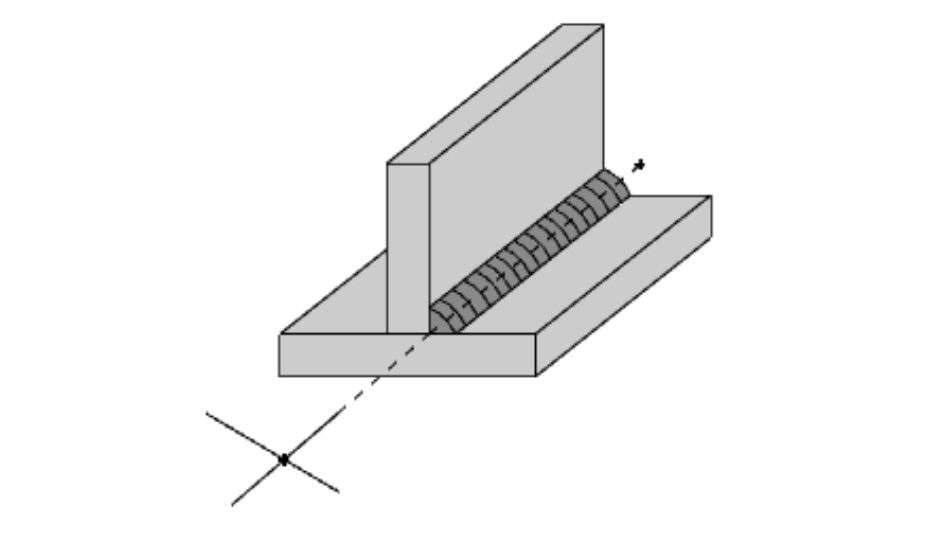
The first step you will need to take is to make sure your base metal plates are flush and lined up the way you want them. You will need to lay down tack at both ends to keep them positioned properly.
While you weld, your torch should be moving up and down slightly. This will make sure the heat gets distributed evenly from one side to the other of the joint.
Keeping an even distribution will prevent your plates from moving too much and keep your molten metal from moving around too much or rolling toward the bottom of the joint. This will help the metal solidify more quickly.
This position will require a lot of skills. You will want to practice a lot before you use this position on anything important.
You will also need to master this position before trying to tackle the others because the vertical and overhead positions are even more difficult.
#4 Overhead Weld
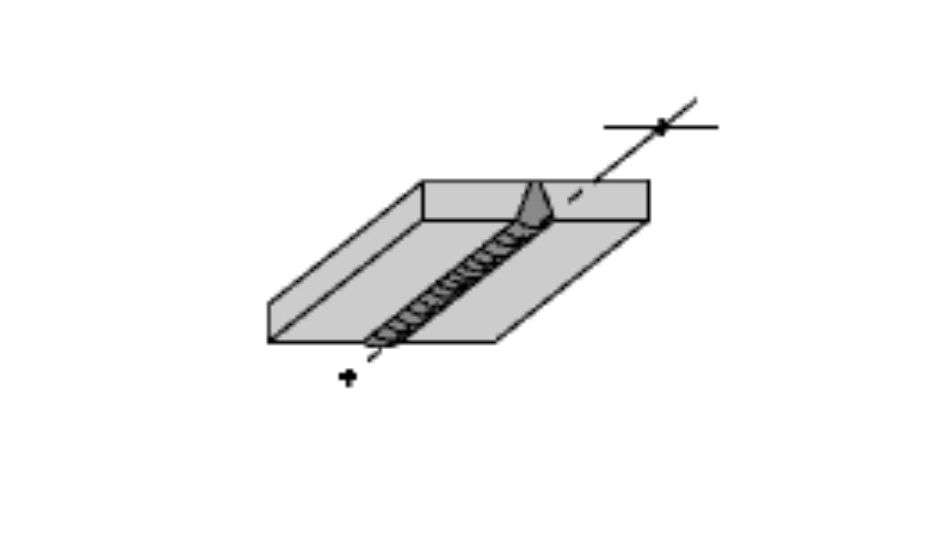
In the overhead welding position, you are performing your weld form below the joint itself. This is the hardest position to perform a weld from, and the technique is complicated. You definitely need to practice this and have a solid mastery of the other techniques before attempting to weld from this position.
In this position, your metal will start to fall onto your base plate. This creates a bead that has too high of a crown to be strong enough. To avoid this problem, you will need to keep your welding puddle as small as you possibly can.
You need enough filler to achieve a strong fusion and reinforce the bead, but not so much that you end up with dripping metal. If your pool gets too big, you need to remove your flame until it cools down a little bit.
This rule is especially true if you’re welding thin or light sheets of metal. For this, you need to maintain strict control over your weld puddle size through a technique of ensuring even heat distribution between the filler rod and base metal.
How to Perform Overhead Welding from 4F on a Lap Joint
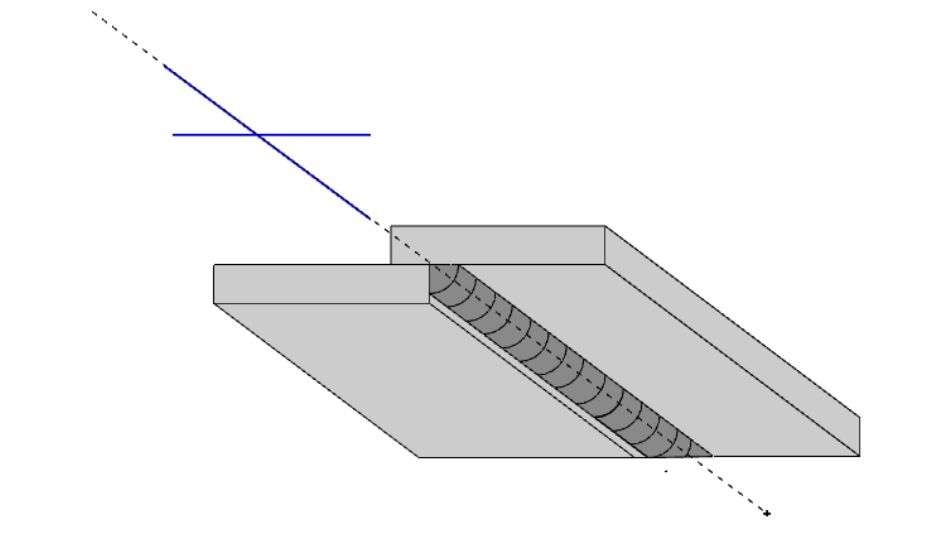
When you are using this technique to weld, you will need to meet both edges of your joint simultaneously. You do this by directly applying your flame to the base. You will use enough filler metal to penetrate the join and offer enough reinforcement to keep a decent weld puddle size.
Your welding flame should be used to support your molten weld pool throughout this process. You also need to be extremely careful, so you can regulate the heat you’re passing through the plates. You need to avoid overheating anything during this process.
#5 Pipe Welding Positions: Pipe and Groove
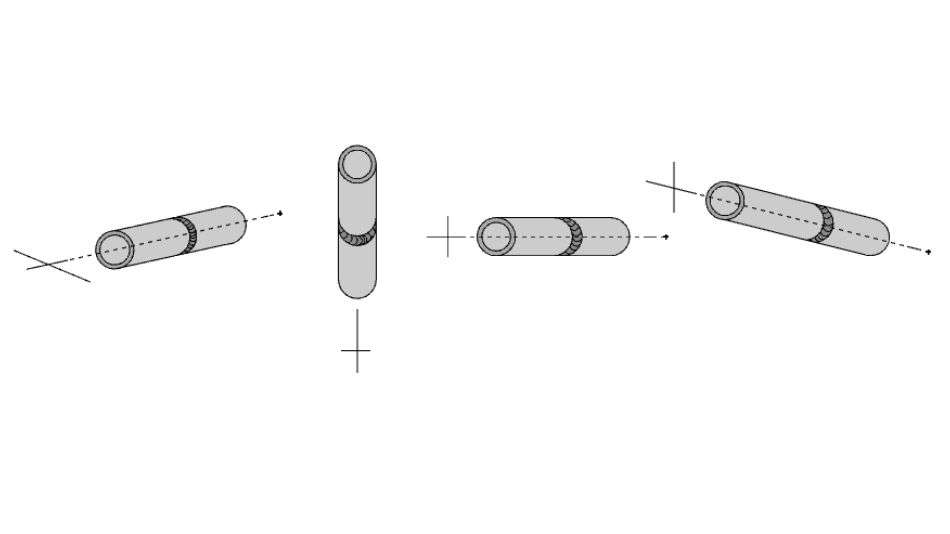
Pipe welding works a bit differently. These have their own positions, including the horizontal rolled, horizontal fixed, vertical, and inclined positions.
Pipe welding can use a large variety of different conditions, so the 4 basic types weren’t quite enough to cover pipe welding, which meant it became its own 5th category as the final basic welding position.
For pope welding, your job will dictate your position. It’s usually fixed, but you could roll it if you want to work in a flat position on some occasions.
Horizontal Pipe Rolled Weld Position
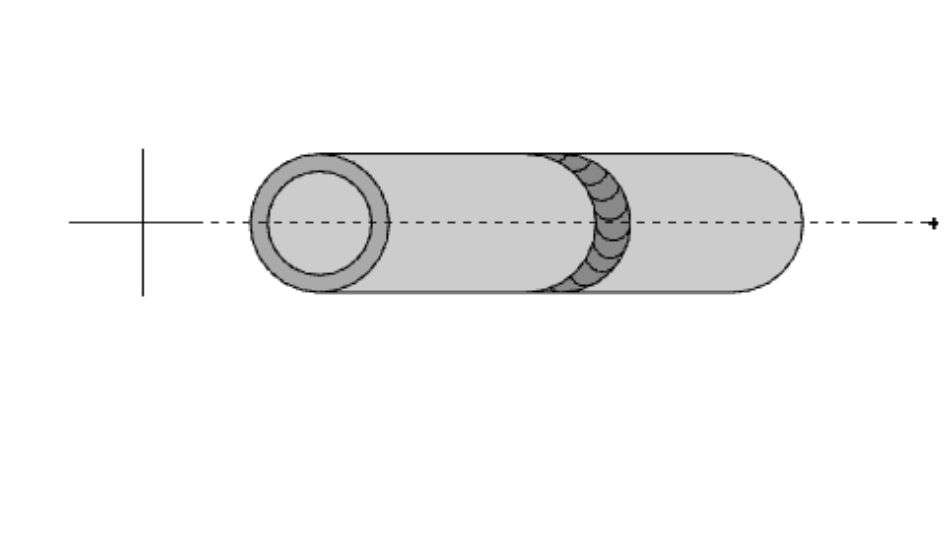
The horizontal rolled pipe weld places the pipe on rollers. You will need to align your joint and then tack weld it into the right position. You could also use bridge clamps if you don’t want to tack. If you look at the circle of the pipe as a clock face, then you will start welding ar somewhere between 2 and 3 on the clock face. In other words, you start at a position that is in the middle of a 45 and 90-degree angle.
From there, you will move upwards towards the 45-degree angle (or 2 o’clock position). When you reach that point, then rotate your pipe clockwise. You will do this until the place you stopped welding reaches the position you started welding and then weld from there upwards to the stopping point again. Repeat this as you move through the pipe.
When you are rotating the pipe, you need to make sure that you hold your torch between your starting and stopping points as you let the pipe rotate past your torch. You want to position your torch somewhere between the 12 and 1 o’clock positions. Your weld will approach a flat weld position as you near point B, so you will need to adjust your torch angle to accommodate this change.
You should stop your weld before your starting point and leave a small opening. Then, reheat your starting point. You want to make sure that the entire area surrounding this point is all at the same temperature. This will let you fuse the weld perfectly with your starting point. If your pipe is over ¼ of an inch in thickness, then you will need to make multiple passes on this weld to ensure adequate penetration.
Horizontal Pipe Fixed Weld Position
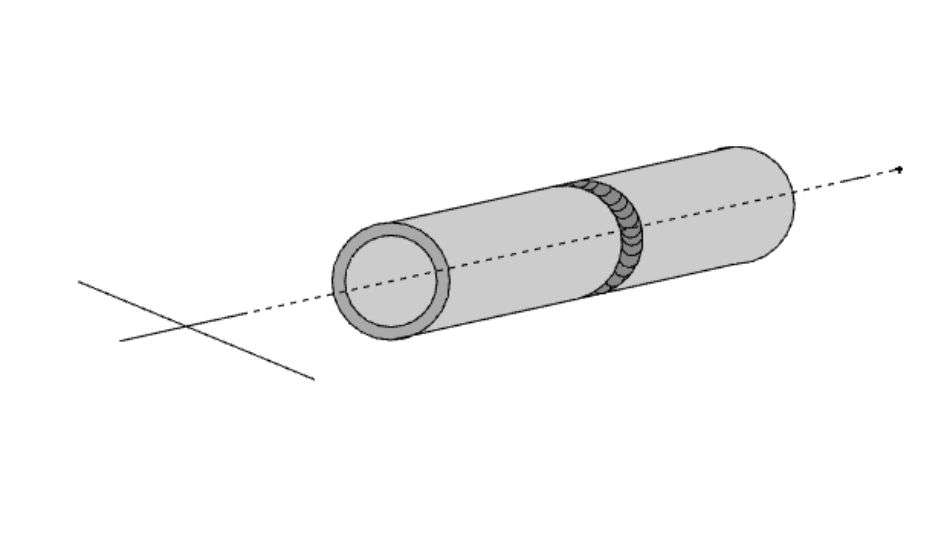
The horizontal fixed pipe position will need to be set up so that your tack welds are in the right position. If you pretend the circular pipe is a compass, then you will need tack welds at the NE, SE, NW, and SW positions. This weld involves 4 different steps.
First, you will start at the S end of the “compass” on the pipe. Move towards the E point by welding upwards along the curve. When you reach that point, stop and move back to the S end of the compass. Then, move towards the W of the compass, welding in the same fashion.
After that, you’re going to move your torch back to the E position and weld upwards until you reach the N point of your pipe compass. Then, stop and move to the W point on your compass and repeat the process, welding upwards to N. Your bead should overlap at the top.
If you weld downward, then you need 2 stages to perform the weld. First, you start at the top of the pipe and work down one side to the bottom. Then, move back to the top and weld down the other side of the pipe, joining your work at the bottom. This method works really well with arc welding because the higher temperate lets you work much faster.
To weld joints made from low carbon or alloy steel piping from the rolled or horizontal position, the backhand method is what you will need to use. Make a single pass if your walls are 3/8 of an inch or less, two passes for thicknesses up to 5/8 of an inch, three passes for up to 7/8 of an inch, and 4 passes for up to 1 and 1/8 of an inch.
Vertical Pipe Fixed Weld Position
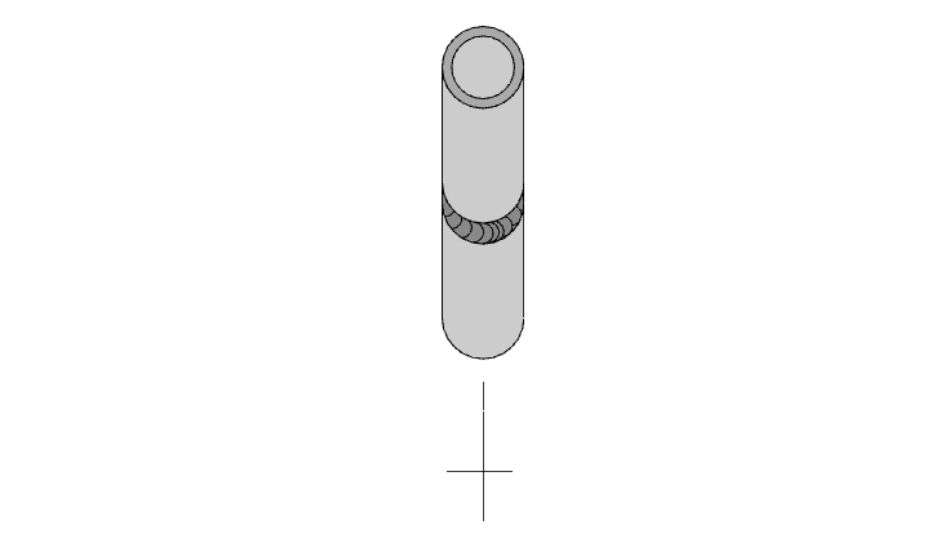
If your pipe is vertical, but your joint is horizontal, you will need to use the vertical pipe fixed position.
Backhand I the most popular method for this joint. For this weld, you will start at your tack and make a continuous weld along the length of the pipe.
Arc Welding Multiple Passes
If you are using a clamp to line up your base, then you will start at the bottom of your groove. If you don’t have a backing ring then you need to be careful. You will want to build a little bit of a bead on the inside of your pipe. If you do use a backing ring, then you need to fuse your root bead to this ring. You need to fill as much of your root bead as you can within the clamp bars before you remove your clamp. Once you remove it, you will need to complete the bead.
For filler beads, you should employ the solid technique and be careful. You need to make sure that these beads get properly fused into the root or you will end up having undercut. You will probably need several filler beads to ensure a strong joint with full penetration.
Then, you need to create finish beads. These beads get placed over the top of the filler beads so that you can complete your joint. This is usually a bead weave that is 5/8 of an inch wide and will show up as about 1/16 of an inch above the outside surface of the pipe.
Welding Aluminum Pipes
If your pipe is aluminum, the same care needs to be taken as you show aluminum welds for anything else.
You will need special joint detailing and a combination of different procedures. Most of these don’t use backing rings.
Welding Symbols
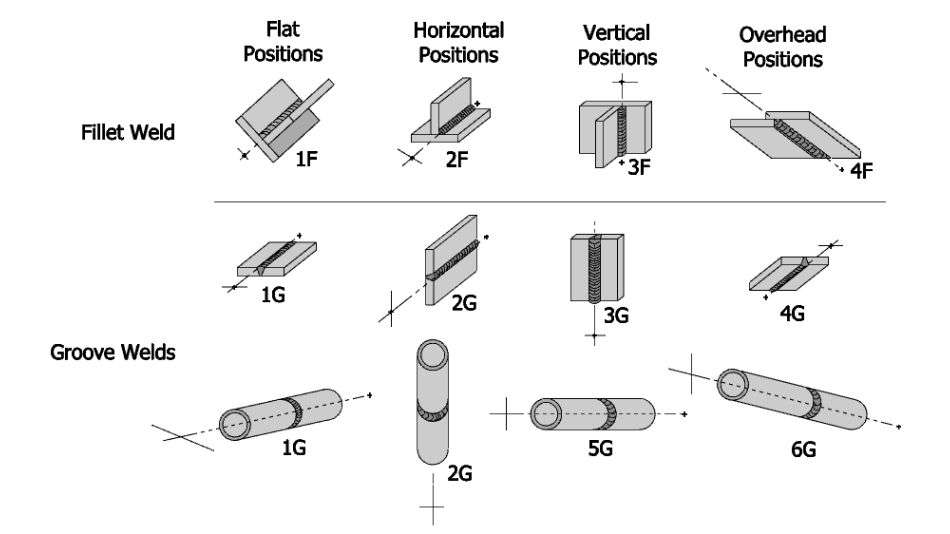
When welding, you will often see symbols and charts. These can e as impossible to understand as an advanced chemistry book is to a middle school student. Let’s take a look at the positions and symbols and what they’re saying to you.
There are 2 basic types of symbols when it comes to these positions. F stands for fillet. This is for all fillet welds. G is for groove and is used for grooved positions and joints. When you hear F or G it simply lets you know what type of weld you’re performing.
1F
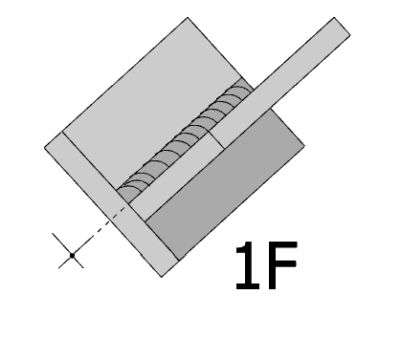
This position is used in the flat welding position. It’s a fillet symbol.
You will see this used when you need to work with filler that has been rotated so it is level with the ground.
This is also the easiest of all welding positions. This position is also called the flat fillet position.
In a fillet weld, this joint will have a base plate that’s at an angle and a joint at a similar angle, so that the joint itself is facing straight upwards, making your weld area completely flat in between the plates being fused together.
2F
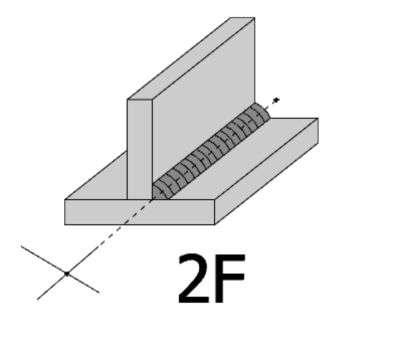
This is another fillet weld position, but it is used in horizontal welding.
If you are using this position then you will need to use the top side of a horizontal surface for welding.
The surface will be lying against another vertical surface. When you weld from this position, your torch’s angle will need to be 45 degrees.
When your filler weld is rotated in such a way that your filler material is horizontal to the ground, then you will need to use this position.
It’s harder to use because your molten weld pool is going to try to move downwards and hit the ground. It will be difficult to prevent your joint from being uneven and having the filler metal pool at the bottom of your joint.
On top of that, your heat will end up moving upward to the top of the joint. With the metal flowing downward and the heat rising upward, it can be very easy to mess up this weld.
You will end up risking burn through at the top of your joint and having no penetration. You will need to work hard to master your technique if you want an even and uniform beading on your joint.
Visually, this joint will have a base plate that is lying flat on the ground and the plate being fused sticking straight up in the air, forming a T. Your weld will be at about a 45-degree angle, because it will be nestled into that corner.
3F
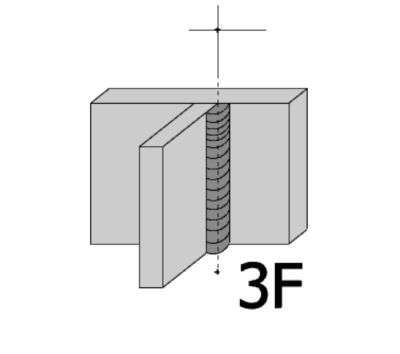
This is a vertical fillet welding position. You will use this position to weld any time your weld position has the filler material vertical with the ground.
This position allows you to weld uphill, using your position to counteract the effects of gravity on your weld. It’s pretty hard compared to 1F and 2F positions.
In this position, you have one base metal plate that is against a wall, and another that is moving out of it at a perpendicular angle, but instead of laying down it is straight up and down like a door hinge or a wall sconce.
You will be filling metal in at a 45-degree angle in the corner that joint forms, but it will be up and down rather than flat.
4F
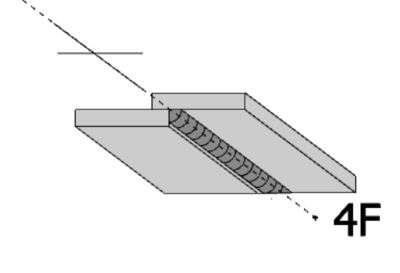
This is an overhead welding position. You will need to use this position when your filet is positioned above you and the filler metal is above you but flat to the ground.
This position is the hardest of all of the fillet (F) positions.
Visually, this looks like a base plate lying flush with a ceiling and the metal being fused to it sticking out perpendicular.
You’re filling the joint together at the 45 degrees in the corner it makes, but the metal pool will actually be above your head, with the danger that the molten metal will drop straight down to the floor.
1G
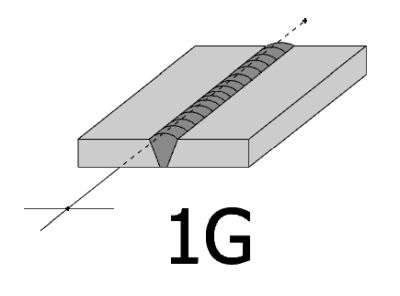
This position is known as the groove welding position.
It’s another flat welding position symbol. If you see 1G, it means your groove weld is rotated in a way that keeps your filler material flat.
Grooves tend to be flat. For this groove, it’s as simple as it gets. Imagine laying 2 flat sheets of metal together along with a table. Your filler metal fuses them together right at the seam. Everything is flat and easy.
2G
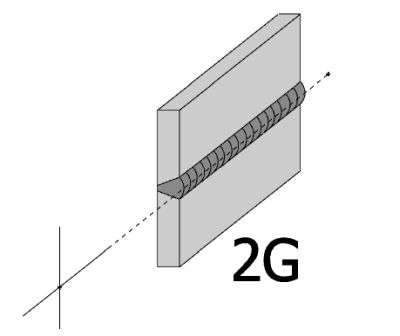
This is another horizontal weld position. IN this position, you will be working with a joint whose axis is horizontal and whose face is vertical.
This vertical groove welding technique is meant to be used when the groove weld is rotated in such a way that your filler material is inclined to flow horizontally. It’s more difficult than 1F, 1G, and 2F.
This is similar to 1G, but it’s up and down, so imagine laying 2 sheets of metal one over the other on a wall. You will be filling in the center along a horizontal line.
3G
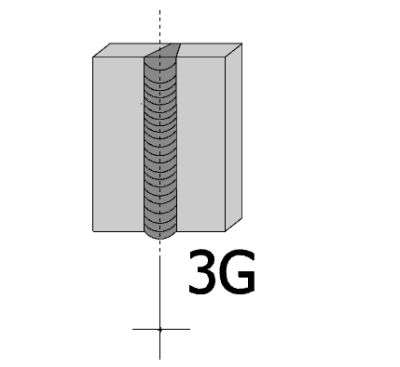
This position is used by moving your welding torch vertically along the surface of the joint.
This is different from any of the other G positions. The advantage of this position is that you can weld much faster with it than other positions.
Unfortunately, it is also much more difficult to achieve deep penetration in this position so you need to master the technique before using it.
This is like 2G, but you’re rotating the sheets so that they’re sided by side instead of one over the other and filling the seam vertically instead of horizontally.
4G
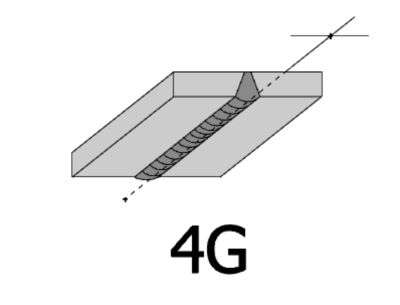
This position is used when a groove weld requires your filler metal to be overhead.
It’s extremely difficult, especially if you are using it on plate metal. You should o attempt this type of weld without mastering all the other positions first.
For this position, you’re taking the side by side and fusing them together again.
Unfortunately, these plates are on a ceiling so you’re working from below them and need to ensure the molten metal doesn’t drop to the ground.
Final Thoughts…
Which of these welding positions have you done? There are so many different techniques that many welders never learn all of them. It is important to master the easier techniques before attempting the more difficult ones.
Once you have learned them all, you will be able to weld anything you need to weld and may even know more than some professionals!

